In order to give your pothos the best chance of thriving, it’s important to properly prepare the roots before planting. This article will guide you through the ideal length of pothos roots for successful transplantation.
Pothos Plant Overview
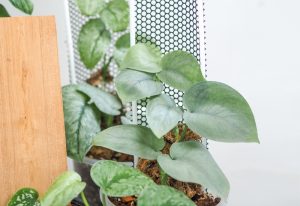
Pothos, also known as Epipremnum aureum or Devil’s Ivy, is a popular and hardy houseplant known for its long, trailing vines and glossy, heart-shaped leaves. These plants are not only beautiful but also easy to care for, making them an excellent choice for both beginner and experienced plant enthusiasts.
One of the most appealing features of pothos plants is their ability to thrive in various lighting conditions, from low light situations to bright, indirect sunlight. In addition to their adaptability, pothos plants are excellent air purifiers, making them a beneficial addition to any living space.
When it comes to propagating and planting pothos, the process is relatively simple. Pothos plants can be propagated through stem cuttings, allowing for easy expansion or gifting of new plants to friends and family. Rooting pothos cuttings typically consists of placing them in water and waiting for their roots to grow.
Ideal Root Length for Planting Pothos
When transplanting pothos cuttings, it is essential to ensure they have the appropriate root length for successful growth. Root development typically takes between 6 to 12 weeks in water, with new growth appearing within 7 to 10 days under ideal conditions, such as sufficient sun, moisture, and humidity. Once the roots are over an inch long, it is generally safe to transplant the cutting1.
In some cases, pothos cuttings may need a slightly longer rooting period before transplanting. Well-established roots should be at least 2 to 3 inches long before planting them in soil2. Ensuring the roots are of the proper length will increase the chances of successful plant growth and overall health.
Here are some guidelines for transplanting pothos cuttings with well-developed roots:
- Choose a well-draining soil mixture for planting.
- Select a small pot with drainage holes to promote proper water drainage.
- Place the cutting in the new pot, being careful not to damage the fragile roots.
- Ensure that the roots are not more than twice the size of the new pot. For example, roots should be no longer than 8 inches if the pot is 4 inches wide3.
- Before transplanting, inspect the roots for any damage or discoloration and trim if necessary.
By following these guidelines, you will be better equipped to transplant pothos plants with an ideal root length, allowing them to thrive in their new environment.
Preparing Pothos Cuttings for Planting
Planting pothos cuttings is a simple process, but there are a few key steps to follow to ensure successful rooting and growth. This section covers the necessary steps, including selecting healthy cuttings and encouraging root growth, to prepare your pothos cuttings for planting in soil.
Selecting Healthy Cuttings
When choosing pothos cuttings for propagation, look for healthy, vibrant stems with several leaves. Avoid stems with yellowing or discolored leaves, as they might be unhealthy or diseased. Take cuttings that are at least 4-6 inches long, with a minimum of one leaf node, the point where the leaves grow from the stem.
Cut the stem just below the leaf node using clean, sharp scissors or a knife. This will encourage root growth from the node when placed in water or moist soil. After cutting, remove the leaves nearest to the node to prevent rot and mold within your growing medium.
Encouraging Root Growth
To promote root development in your pothos cuttings, place them in a container with a few inches of water, ensuring that the leaf node is submerged. Make sure the container is positioned near natural light, but not in direct sunlight, which could cause the water to get too hot or evaporate too quickly.
Roots will begin to develop within 7 to 10 days under ideal growing conditions (Houseplant Authority). After about a month, or when the roots have reached 2-3 inches long, the cuttings are ready to be planted in soil (Gardening Know How). A well-draining soil mixture and a small pot with drainage holes are recommended for planting.
Monitor the water level in the container where your cuttings are developing roots, and replenish as needed. You may also use a rooting hormone to accelerate root growth if desired, but pothos cuttings are generally easy to root without it.
Planting Pothos with Developed Roots
Pothos roots should be at least 2 to 3 inches long before planting them in soil, ensuring a successful transition and healthy growth of the plant.The Spruce
Potting Soil and Container Selection
Choosing the right potting soil and container plays a crucial role in the successful transplantation of pothos. A well-draining soil mixture is necessary for proper root development, and a container with drainage holes helps to prevent waterlogged soil and root rot.
- Soil: Use a well-draining soil mixture, such as a mix of peat moss, perlite, and vermiculite. This type of soil ensures proper aeration, moisture retention, and drainage.
- Container: Select a small pot with drainage holes to allow excess water to escape, preventing the risk of root rot. The pot should be just a few inches larger in diameter than the root ball, allowing space for root development.
Planting Technique
Planting pothos cuttings with developed roots in soil requires proper technique to encourage healthy growth. Follow these steps to transplant the rooted cutting:
- Prepare the container: Fill the pot with a well-draining soil mixture, leaving some space at the top for the cutting.
- Insert the cutting: Create a hole in the soil with a finger or small gardening tool. Gently place the cutting (with its developed roots) into the hole, ensuring the roots are covered with soil.
- Secure the cutting: Gently press the soil around the base of the cutting to provide support and ensure proper contact with the roots.
- Watering: Water the newly planted cutting thoroughly to help the soil settle and provide moisture for the roots. Maintain moist soil, but avoid overwatering as it can lead to root rot. Misting the soil every few days is a good practice.
Transplanting pothos cuttings with roots at the optimal length will result in healthier plants and enhance their ability to adapt to their new environment.
Caring for Newly Planted Pothos
After transplanting your pothos with roots of about 3 inches long, it’s important to provide the right care to ensure healthy growth. This section discusses the light requirements, water, and fertilizer needs of newly planted pothos plants.
Light Requirements
Pothos plants thrive in bright, indirect light. Ensure that you place the newly planted pothos in an area that receives sufficient natural light, but avoid direct sunlight, as it can scorch the leaves. If natural light is limited, you can use artificial grow lights as an alternative source. Gradually acclimate the plant to its new light conditions to avoid stress and encourage steady growth.
Water and Fertilizer
Proper watering and fertilization are essential for the growth of newly planted pothos. It’s important to keep the soil moist but not wet to prevent root rot. You can check the moisture level by touching the soil with your finger – it should feel slightly damp. Water the plant thoroughly when the top inch of soil feels dry, allowing excess water to drain from the bottom of the pot.
Fertilize the pothos with a balanced, water-soluble fertilizer every four to six weeks during the growing season. Follow the label instructions for proper dosage and application frequency. Another option is to use a slow-release plant food for consistent, continuous feeding. Avoid over-fertilization, as it can lead to leaf burn and poor plant health.
Helpful Video

My name is Daniel Elrod, and I have been houseplant love ever since I was 17. I love how much joy they bring to any room in the home. I’ve always been amazed at how a few pots of flowing leaves can turn a drab and sterile office into an inviting place where people love to work at.