Propagating Pothos is an easy and rewarding way to create new plants from existing ones. There are several methods of propagation, including using cuttings, division, and layering. In this article, we’ll explore the different ways to propagate Pothos, including step-by-step instructions for each method. We’ll also provide some tips for choosing the right tools, preparing your plant, and caring for your newly propagated Pothos to ensure it grows healthy and strong. Whether you’re a seasoned plant owner or new to propagation, this guide will help you successfully propagate your Pothos and expand your plant collection.
How to Identify Pothos
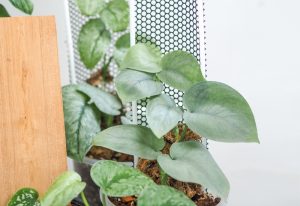
Pothos, also known as Epipremnum aureum, is a popular houseplant due to its low-maintenance nature and attractive trailing vines. To successfully clip and propagate pothos, it’s essential to first identify the plant correctly.
Pothos plants exhibit several distinctive features, allowing for easy identification. Their leaves are heart-shaped and typically come in shades of green with various variegation patterns. Some common pothos varieties include:
- Golden Pothos: Characterized by green leaves with yellow marbling and a glossy appearance.
- Marble Queen Pothos: Notable for its creamy white and green variegation on the leaves.
- Jade Pothos: Identified by its solid dark green leaves without any variegation.
The vines of pothos plants tend to trail and can grow quite long, making them ideal for hanging baskets or cascading from shelves. Additionally, one of the key identifying features of pothos is the presence of nodes along the stem. Nodes are small bumps where leaves join the stem, and aerial roots often develop from these points.
When identifying pothos, it’s worth noting that they’re often mistaken for other trailing plants such as Philodendron species. To differentiate between the two, observe the leaf texture and growth pattern. Pothos leaves tend to be thicker and more succulent than Philodendron leaves, which are thinner and more delicate.
In summary, to identify pothos plants, look for heart-shaped leaves with green and variegated color patterns, trailing vines, and the presence of nodes along the stem. Familiarizing yourself with these features will ensure successful clipping and propagation techniques are applied to the appropriate plant.
Preparing for Clipping Pothos
Gathering Necessary Materials
Before clipping pothos and putting them in water, it is essential to gather the right materials. These items include:
- A healthy pothos plant: Choose a plant with no signs of disease or pest infestation.
- A pair of sterile scissors or gardening shears: This ensures clean cuts without damaging the plant.
- A clear container: Mason jars, glass vials, or small vases work well for holding the cuttings in water.
- Tap, filtered, or rainwater: Avoid using tap water with harsh chemicals or minerals that might harm the cuttings.
- A pot with drainage holes: This will be needed later for transplanting the rooted cuttings into soil.
Selecting Healthy Pothos Nodes
When preparing to clip pothos, it is crucial to identify healthy nodes for successful propagation. Follow these steps:
- Inspect the pothos plant: Look for nodes or points where leaves meet the stem.
- Choose a stem section: Select a healthy stem with at least two leaves.
- Cut the stem: Use sterile scissors or shears to cut at an angle just above a leaf node.
Remember that selecting healthy nodes increases the chances of successful propagation. Once the necessary materials are gathered and the appropriate nodes are selected, the pothos cuttings can be placed in water to start the rooting process.
Clipping Pothos Method
Cutting Method
To ensure successful pothos propagation, start by selecting a healthy pothos plant with robust stems and well-developed leaves. With a sterile pair of scissors or gardening shears, cut off a section of the stem, ensuring that the cutting includes at least two leaves. It’s best to make the cut at an angle just above a leaf node, which is where the leaf meets the stem.
Encouraging Root Growth
After cutting, immediately place the stem in a small, clear container filled with filtered, rainwater, or distilled water, as tap water may contain chemicals and minerals that can harm the cuttings. Make sure the water level is high enough to submerge at least two root nodes. You may also add a little liquid fertilizer to the water to further promote root growth. Keep the container in a spot with indirect sunlight and maintain a moderately warm temperature for optimal growth.
To monitor the progress of rooting, it’s a good idea to use a transparent container, such as a mason jar or glass vial. This way, you can watch as the roots start to develop and grow. Remember to change the water at least once a week to maintain a clean environment for your pothos cuttings.
During the root development phase, avoid direct sunlight exposure, as it can stress the cutting and slow down the growth process. The rooting process usually takes about two to four weeks, depending on the water conditions and the overall health of the cutting. Once a healthy root system has developed, you can transplant the pothos cutting into a pot with drainage holes and a suitable potting mix for long-term growth.
Transferring Pothos to Water
Preparing the Water
When propagating pothos in water, it’s essential to use the right type of water. Filtered, rainwater, or distilled water is highly recommended, as tap water can contain chemicals and hard minerals that may harm the cuttings. Adding a little liquid fertilizer to the water can also boost the growth process.
Submerging the Cuttings
To begin rooting pothos in water, follow these steps:
- Select a healthy vine from an existing plant. Avoid brown or yellowing leaves.
- Cut the vine right below a node. Aim for a cutting that is about 4 to 6 inches in length. If possible, include aerial roots.
- Remove all leaves below the node. This is essential to prevent their decay underwater and potential suffocation of new roots.
- Place the cut end of the pothos cutting around an inch into the water. If using a growing stake, position it next to the vine root and wrap the vine around the root to help direct growth.
- Set the container in a location that receives indirect sunlight. Ensure room-temperature settings.
Monitor the container regularly for moisture needs. New roots or growth signs should appear in about 4 to 6 weeks. Replace the water at least once a week to prevent bacteria buildup and root rot.
Monitoring Pothos Growth
Water Change Schedule
Monitoring the growth of pothos plants in water involves keeping track of the water quality and the development of roots. A crucial aspect of care is maintaining a consistent water change schedule. Change the water in the container every 1-2 weeks to maintain its cleanliness and provide the pothos with fresh nutrients [1]. This practice ensures that the plant gets fresh water and prevents the growth of harmful bacteria or algae.
Root Development
Keep an eye on the root development of the pothos cutting. Typically, small white roots will begin to emerge from the nodes within a few weeks of placing the cutting in water [2]. During this period, maintain the water level in the container so that the nodes stay submerged. As the roots grow, they may become denser and more visible. If desired, you can gently lift the cutting out of the water to check on its progress.
Signs of Growth
As the pothos plant grows, new leaves will start to sprout along the stem. This is a positive indication of healthy growth. Additionally, the existing leaves should maintain their vibrant green color. Monitor the plant for any signs of discolored, wilted, or brown leaves, which could indicate an issue with water quality, lighting, or overall plant health [3]. Address any issues proactively by adjusting the water change schedule, providing appropriate indirect sunlight, and using a well-balanced liquid fertilizer as needed.
A Word of Caution
Growing pothos in water is generally low-maintenance, but be aware of potential problems. Root rot can occur if the water becomes stagnant, so be vigilant about changing the water regularly [4]. Also, ensure your pothos plant receives sufficient indirect sunlight, as a lack of light can slow growth or cause yellowing leaves. Finally, take note of any pests or diseases affecting the plant’s foliage and address them promptly.
Transplanting to Soil
When it’s time to transfer your pothos cuttings from water to soil, there are a few essential steps to follow for a successful transition. Before transplanting, ensure the roots of the cutting have grown to around 1-2 inches in length, as this will improve their chances of adapting to the soil.
Begin by preparing the pot you wish to transfer the pothos cuttings to. Choose a well-draining soil mixture and a container with drainage holes to prevent waterlogged soil. Line the base of your pot with 2 inches (5 centimeters) of lightly damp soil.
After prepping the pot, gently lay the pothos cutting with its roots spread out on top of the soil layer. Carefully fill in the space around the cutting with more soil, pressing it down gently, but not compressing it. This will ensure the roots establish themselves firmly in their new environment.
Following the transfer, give the freshly potted plant a generous watering. Pothos cuttings are used to hydrating from their time propagating in water, so it will help them adjust to their new surroundings. It’s important to strike a balance in watering by keeping the soil evenly moist during the first one to two weeks.
Finally, place the potted pothos cutting in a location with bright, indirect light. This will encourage healthy growth and adaptation to the soil. As your pothos establishes itself in its new home, do your best to maintain the appropriate care routine, including watering, feeding, and monitoring for signs of growth or distress.
Following these steps will help your pothos cutting transition smoothly from water to soil, setting it up for a healthy and thriving future as a beautiful houseplant.
Video Guide

My name is Daniel Elrod, and I have been houseplant love ever since I was 17. I love how much joy they bring to any room in the home. I’ve always been amazed at how a few pots of flowing leaves can turn a drab and sterile office into an inviting place where people love to work at.